Nigezza Creates aka Gez, Independent Stampin' Up® Demonstrator
Hi and thank you for joining me today. I am doing my Tuesday project a day early to coincide with the Design Team Challenge over on the Facebook group #stampinforall run by Amanda Charlseworth, Srimping Mommy.
Each Monday one of the design team members makes a project and shares the theme with the group and members are invited to make their versions and we then do a blog on the following Saturday to showcase what everyone has made. The theme for this challenge was Frame/Home decor
I have decided to share my tutorial and instructions for making this project first because some people may have never come across a tutorial for making these shadow box frames and I wanted to save everyone the trouble of watching loads of tutorials to get the method. To prepare for this I did watch loads of tutorials, there are different ways people make these frames and this is the way I found easiest. It is very easy to resize the frames and I will explain that here.
I made this frame for my son who recently bought his first house and I wanted to make something a bit more special that a new home card. I wanted something that he could use as a piece of home decor so it was the perfect project for the Design Team Challenge as that was the theme.
Video Tutorial
I have tried really hard to write the instructions, but you may find it easier to watch the video through first before you make your first one. Click below to watch the tutorial :-)
Measurements and Materials
- 4 sheets of 6x6 paper
- I used the new In Colour 6x6 paper packs
- Each frame is made in exactly the same way and the principle can be used on any size square or rectangle.
- I made my frames with a 3/8" frame, this size can be changed easily and the same process of scoring applied
- My frames measure 3" x 3" when made up
- The internal measurement is 2 1/4" x 2 1/4"
Scoring and Sticking the Frame
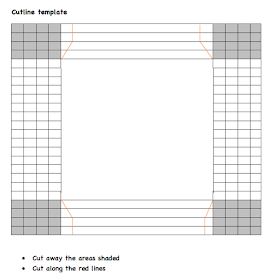
- Score @ 3/8" - 3/4" - 1 1/8" - 1 1/2"
- Repeat on all 4 sides
- On 2 sides opposite each other do 2 more score line @ 1 7/8" - 4 1/8"
- Score down to the second score line and then STOP
- Now cut off all 4 corners where the score line across and you have a grid
- I have saved these squares and intend to use then on another project!
- Now cut down the 4 score lines you made
- When you get to the second score line cut diagonally to meet the score line on the adjacent corner
- Repeat for all four corners
- Fold and burnish all score lines
- Put what ever strong adhesive you like on the outer edge of the frame (on the wrong side) starting with the two sides that are not trimmed down
- Fold the glued edge at the second score line (glue side facing up)
- Now fold over again so it doubles over
- The edge will now be stuck in place
- Fold back and forth and burnish again
- The edge should now stand up in a square
- Repeat on the opposite edge
- It is slightly different for the cut edge
- Apply adhesive to the wrong side as before
- Fold over just the glued edge to the right side
- Fold at the third score line
- Slightly flatten the side so that they will fit under the mitered edge
- Repeat for other side
- Use a glue dot to hold in place
- For larger frames you can apply adhesive to the diagonal edge before you fold up
- The video tutorial demonstrates this for you is you have difficulty following the written instructions.
Template
How to resize your frame
- 6" x 6" paper size with a 3/8" frame edge
- 8 x 3/8 = 3
- So frame is 3" x 3"
- 12" x 12" paper size with 1/2" frame edge
- 8 x 1/4 = 4
- So frame size is 8" x 8"
To work out the internal size of the frame you multiply the frame edge by 10 because it has 4 edges and is then folded in one more time.
- 6" x 6" paper size with a 3/8" frame edge
- 10 x 3/8 = 3 3/4
- So internal frame is 2 1/4" x 2 1/4"
- 12" x 12" paper size with 1/2" frame edge
- 10 x 1/2 = 5
- So internal frame size is 7" x 7"
I hope that makes sense!
You can of course use a piece of paper that is a rectangle and the principal is the same.
- 12" x 10 1/2" paper size with 1/2" frame edge
- External frame size is 8" x 6 1/2"
- 8 x 1/2 = 4
- 12-4 = 8
- 10 1/2 - 4 = 6 1/2
- Internal frame size is 7" x 5 1/2"
- 10 x 1/2 = 5
- 12 - 5 = 7
- 10 1/2 - 5 = 5 1/2
The extra 2 score lines you add for the cutting line is always the same distance away from the last score line as the frame edge. So if it is 1/2" then you score 1/2" after the last score line of the first 4 you score and 1/2 BEFORE the next 4 lines you score. ONLY SCORE TO THE SECOND SCORE LINE.
Sticking the frames together
- I used some chip board, I recycle backs of writing pads, the cardboard that comes with some paper packs, you can buy chipboard but I have never had to with being a teacher I have endless supplies of A4 note pads and my students know I use the backs of them!
- I cut a strip 2" x 12" - if you only have a back of a writing pad then it would still work, I used the chipboard that came with the Glimmer paper
- I stuck the first frame with the bottom edge to the bottom of the strip and the left side to the left side of the strip
- I then stuck the next frame with the top edge to the tope of the strip and stuck the sides of the frames together
- The next frame was stuck with the bottom edge to the bottom of the strip and edges again glues to the the frame
- The final frames top edge was stuck to the top of the strip
- This ensured that the frames were evenly adhered
- I then stuck some ribbon to the back of the chip board for hanging the frames up
- I used the Whisper White fine ribbon
- I then cut some white card to cover this and gave me something I could write on
- I used the stiff white card that comes with a paper pack - hate to waste anything!
Decorating the frames
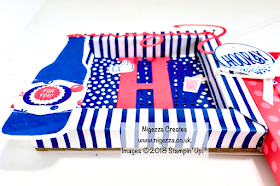
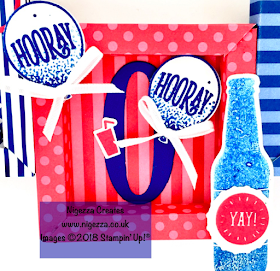
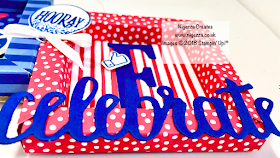
- I used the large letter dies to spell HOME
- The letter fit perfectly into these frames
- I stuck to the sea colours and used the opposite colour in each frame
- I then used different stamp and die sets to cut out, beer bottles, thumbs up, drinks glasses, balloons and the words Amazing and Celebrate
Stampin' For All Facebook Group
I do hope you liked this project and will make some frames for yourself. Please go to the #stampingforall FaceBook group and join in with the challenge. You can make any type of frame, you can do just one you do not have to make multiple to join together. I will be blogging about everyones contributions on Saturday, and featuring pictures of everyones makes, so please join in. They are actually really easy to do once you have made one. I made about 8 in one evening in front of the TV!
Click here to go to the group
I will not be doing my normal Tuesday tutorial as I have done it today instead, so I will be back on Thursday with another blog and video tutorial. Until then have fun :-)
Gez xxx
Product List
Click here to go to the group
I will not be doing my normal Tuesday tutorial as I have done it today instead, so I will be back on Thursday with another blog and video tutorial. Until then have fun :-)
Gez xxx
Product List
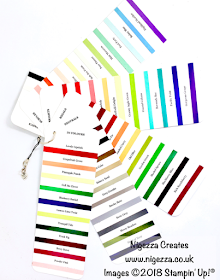
Don't forget that with every order in June I am adding a colour swatch to the thank you gifts. Please use the Host code as well to ensure you get some FREE products as well.
My Shop
June Host code is NNQHNSFR
My Team
- Click here to join my team!
- No obligation to sell, make videos, blog etc
- You can just join up and get the 20% discount for yourself
- If you want to start a business for £99 then this is the way to do it!
- Chose £130 of products for £99
- You also receive a business pack to get you started
- 2 months FREE online shop
- Support from me and the wider team when you join my team
- I am a Simply Stylish Stamper which is Crafty Carolines team
- I am also a Pootler which is Pootles team (Sam)
- You will also become one of these when you join with me





Fabulous Gez, and what a challenge for us Stampin FOR ALL card crafters this week too. Thank you for giving us inspiration to get us started on this challenge. :O)
ReplyDeleteThank you Lorraine, I hope you enjoy taking part in the challenge, I look forward to seeing what you come up with :-)
Delete