I help out at my local Guide group so I want to give them all a little Easter egg with out breaking the bank. So I have bought some inexpensive foiled covered egg and decided to make boxes for them to make them look special. I have made 4 different designs. My original measurements mean that you can only get one from a 12x12 sheet (with LOADS of paper left over) but a small adjustment meant you can 2 from a 12x12 sheet (again with a sizeable amount left over)
I coloured the DSP with an ink pad, I literally covered the paper in ink by turning the pas upside down and dragged it all over the paper until it was covered evenly. You can use a sponge brayer but that will take time to build up the colour but if you want a lighter finish then this would be the way to do it.
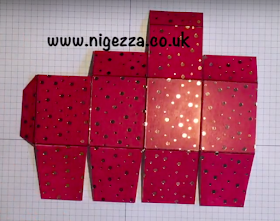
Measurements
- 6 1/4" x 7 1/2"
- Score on long side @ 1 3/4" - 3 1/2" - 5 1/4" - 7
- Score on short side @ 1 3/4" - 4" - 5 3/4"
Alternate Measurements (to get 2 boxes from a 12x12 sheet)
- 6 x 7 1/2"
- Score on long side @ 1 3/4" - 3 1/2" - 5 1/4" - 7
- Score on short side @ 1 1/2" - 3 3/4" - 5 1/2"
Box 1
- I used the smallest Stitched Oval to make an aptiture in the front of the box
- I used the little flower die from Petals and More die set
- I made a 'Happy Easter' tag using the Tiny Tiny sentiments
- This was attached to twie that was tied round the top.
Box 2
- I forgot to make the appiture in this box! lol
- Berry Burst Ink Pad to colour the Cardstock
- So I just made a circle tag and tied a ribbon around the top
- I used the 1 3/8" Scallop Circle Punch
- A Good Day stamp set for the sentiment
- 1 1/4" circle punch
- Berry Burst 3/8" Metallic-Edge Ribbon
Cutting template
Part 1 video tutorial
I did the video in 2 parts, the first shows the basic box making and how I decorated the Box 1. Click below to watch.
Box 3
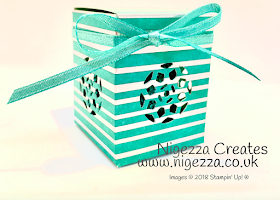
- I Used Bermuda Bay ink for this one
- I used the FREE ribbon from the 3 pack
- I cut the aperture by using on elf the small stay in dies from the Eastern Medallions Set
Box 4
- I did not colour this one
- I cut the mini starburst using the die from Paisley Framelits
- I used the Copper Trim to tie the bow
Part 2 video tutorial
Click below to watch the second part of the tutorial where I demonstrate how I decorated the other boxes.
I do hope you enjoyed this tutorial and give it a go, if you do I would love to see your makes :-)
See you soon
Gez x
My Shop
My shop is open 24/7 Click here to shop! Remember that during Sale-A-Bration you earn free products for every £45 you spend (not including p&p)Joining Offer
There is no better time to join Stamping' Up, during Sale-A-Bration you get to chose- £130 worth of products for your starter kit
- AND 2 stamp sets of your choice
- All for £99 (p&p free with starter kits).
- 20% discount on future orders, rising to 25% when promoted
- There is no obligation to sell you can be a hobby demonstrator and just shop for yourself with the 20% discount.
- Click here to join my team!
Follow me on Facebook
Follow me on Instagram
Follow me on Pinterest


No comments:
Post a Comment