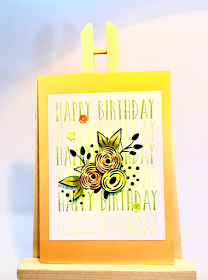
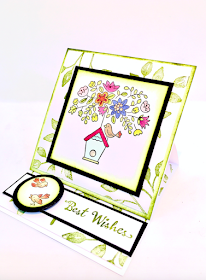
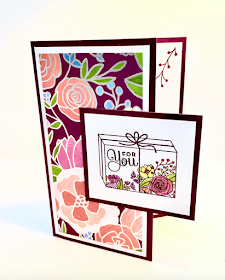
Pages

Tuesday, 27 February 2018

Stampin' Up!® Springtime Foils Easter Egg Boxes

Thank you for joining me today when I am sharing my Easter egg Boxes I made using Stampin' Up! Sale-A-Bration free Springtime Foils speciality paper. This paper is absolutely stunning and it is such a good weight that it really does make great boxes and it's FREE!

Mini Easter Egg Boxes  Springtime Foils


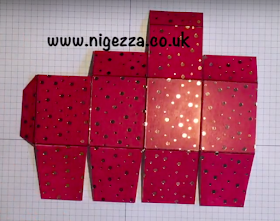
I help out at my local Guide group so I want to give them all a little Easter egg with out breaking the bank. So I have bought some inexpensive foiled covered egg and decided to make boxes for them to make them look special. I have made 4 different designs. My original measurements mean that you can only get one from a 12x12 sheet (with LOADS of paper left over) but a small adjustment meant you can 2 from a 12x12 sheet (again with a sizeable amount left over)

I coloured the DSP with an ink pad, I literally covered the paper in ink by turning the pas upside down and dragged it all over the paper until it was covered evenly. You can use a sponge brayer but that will take time to build up the colour but if you want a lighter finish then this would be the way to do it.

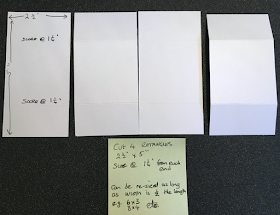
Measurements

  • 6 1/4" x 7 1/2"
  • Score on long side @ 1 3/4" - 3 1/2" - 5 1/4" - 7
  • Score on short side @ 1 3/4" - 4" - 5 3/4"

Alternate Measurements (to get 2 boxes from a 12x12 sheet) 

  • 6  x 7 1/2"
  • Score on long side @ 1 3/4" - 3 1/2" - 5 1/4" - 7
  • Score on short side @ 1 1/2" - 3 3/4" - 5 1/2"

Box 1

  • I used the smallest Stitched Oval to make an aptiture in the front of the box
  • I used the little flower die from Petals and More die set
  • I made a 'Happy Easter' tag using the Tiny Tiny sentiments
  • This was attached to twie that was tied round the top.
Mini Easter Egg Box 1 Springtime Foils

Box 2

  • I forgot to make the appiture in this box! lol
  • Berry Burst Ink Pad to colour the Cardstock 
  • So I just made a circle tag and tied a ribbon around the top
  • I used the 1 3/8" Scallop Circle Punch
  • A Good Day stamp set for the sentiment
  • 1 1/4" circle punch
  • Berry Burst 3/8" Metallic-Edge Ribbon
Mini Easter Egg Box 2 Springtime Foils

Cutting template 

Mini Easter Egg Box Springtime Foils

Part 1 video tutorial

I did the video in 2 parts, the first shows the basic box making and how I decorated the Box 1. Click below to watch.


Box 3
  • I Used Bermuda Bay ink for this one
  • I used the FREE ribbon from the 3 pack 
  • I cut the aperture by using on elf the small stay in dies from the Eastern Medallions Set
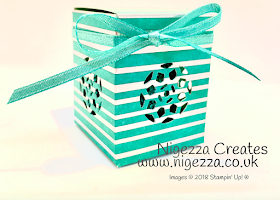
Mini Easter Egg Box 3 Springtime Foils

Mini Easter Egg Box 3 Springtime Foils

Box 4

  • I did not colour this one 
  • I cut the mini starburst using the die from Paisley Framelits
  • I used the Copper Trim to tie the bow
Mini Easter Egg Box 4 Springtime Foils

Mini Easter Egg Box 4 Springtime Foils

Part 2 video tutorial

Click below to watch the second part of the tutorial where I demonstrate how I decorated the other boxes.


I do hope you enjoyed this tutorial and give it a go, if you do I would love to see your makes :-)

See you soon

Gez x

My Shop 

My shop is open 24/7 Click here to shop! Remember that during Sale-A-Bration you earn free products for every £45 you spend (not including p&p)

Joining Offer

There is no better time to join Stamping' Up, during Sale-A-Bration you get to chose

  • £130 worth of products for your starter kit 
  • AND 2 stamp sets of your choice 
  • All for £99 (p&p free with starter kits). 
  • 20% discount on future orders, rising to 25% when promoted
  • There is no obligation to sell you can be a hobby demonstrator and just shop for yourself with the 20% discount. 
  • Click here to join my team!


Follow me on Facebook

Follow me on Instagram

Follow me on Pinterest

Sunday, 25 February 2018

Endless Card Using FREE Sale A Bration Dies from Stampin' Up!®

Yesterday I took part in a blog hop. Today I am sharing the video tutorial for the project I shared.

Endless card SAB 2018

Click here to see original post with all the measurements.


Click below to watch the video tutorial.


If you want to write in the card you just need to leave a blank section on the final face like this

Endless card

I hope you enjoyed this project :-)

Gez xxx

My Shop 

My shop is open 24/7 Click here to shop! Remember that during Sale-A-Bration you earn free products for every £45 you spend (not including p&p)

Joining Offer

There is no better time to join Stamping' Up, during Sale-A-Bration you get to chose

  • £130 worth of products for your starter kit 
  • AND 2 stamp sets of your choice 
  • All for £99 (p&p free with starter kits). 
  • 20% discount on future orders, rising to 25% when promoted
  • There is no obligation to sell you can be a hobby demonstrator and just shop for yourself with the 20% discount. 
  • Click here to join my team!


Follow me on Facebook

Follow me on Instagram

Follow me on Pinterest

Saturday, 24 February 2018

InspireINK Fancy Fold Blog Hop: Endless Card


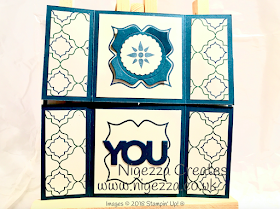
Hi and welcome to the inspireINK blog hop. This month the theme is Fancy Fold Cards. I have used the FREE Sale-A-Bration Thinlit Dies for this card and the Eastern Palace suite. I love this suite and have neglected it recently.

There are many tutorials on YouTube for making an endless card, I have sized this one so it can me made using a sheet of A4. A lot of tutorials use 12x12 cardstock so I wanted to make one that used a standard piece of cardstock.

Endless Card InspireINK Blog Hop

Measurements

Card base: 

  • 2 x Dapper Denim cardstock 5"x5" 
  • Score  both squares @ 1 1/4" from each end
  • Cut squares in half so you have 4 rectangles 2 1/2" x 5" 

Mats

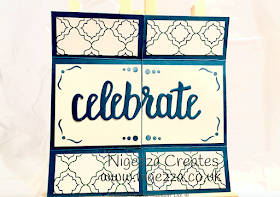
First face of card

  • 2 x Eastern Palace DSP 1"x 2 1/4"
  • 2 x Very Vanilla Cardstock 2 1/4" x 2 3/8"
  • Scrap of Dapper Denim to cut the 'Celebrate' from
inspreINK blog hop endless card

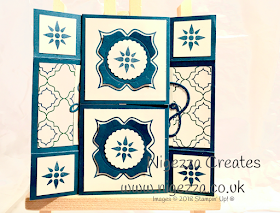
Second face of card
  • 4 x Very Vanilla Cardstock 1"x1"
  • 2 x Very Vanilla Cardstock 2 1/4" x 2 1/4"
  • 2 x Eastern Palace DSP 1"x 2 1/4"
  • Scrap of Dapper Denim to cut the Eastern Medallion 
  • Scrap of Very Vanilla to cut the scallop circle using 1 1/8" Scallop Circle Punch 
inspreINK blog hop endless card
Add caption

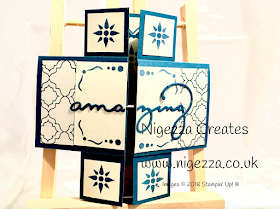
Third face of card
  • 4 x Very Vanilla Cardstock 1"x1"
  • 2 x Very Vanilla Cardstock 2 1/4" x 1 3/8"
  • Scrap of Dapper Denim to cut the 'amazing' from
inspreINK blog hop endless card

Forth face of card
  • 2 x Very Vanilla Cardstock 2 1/4" x 2 1/4"
  • 4 x Eastern Palace DSP 1"x 2 1/4"
  • Scrap of Dapper Denim to cut the Eastern Medallion 
  • Scrap of Very Vanilla to cut the scallop circle using 1 1/8" Scallop Circle Punch 
  • Scrap of Dapper Denim to cut the 'YOU' from
inspreINK blog hop endless card


Assembling the card

inspreINK blog hop endless card
  • This card can be made in different sizes as long as the width of each rectangle is half the size of the length e.g. 3" x 6" or 3 1/2" x 7" or  4"x 8" etc also remember to adjust the score line to be 1/4 of the length e.g. for 6" score @ 1 1/2", 8" score @ 2"
  • Fold and burnish all score lines
  • Lay rectangles in pairs next to each other but at right angles to each other
  • The folds should be faced down on one pair and faced up with the other pair
inspreINK blog hop endless card

  • Put adhesive - I used Tombow - in each corner to the half way point
  • I drew a line 1 1/4" along so I knew where to place the glue
inspreINK blog hop endless card

  • Stick the top rectangles to the bottom rectangles 
  • Make sure they are flush at each corner
inspreINK blog hop endless card

  • Once stuck run the bone folder over the scored lines
  • Fold out the centre flaps to form new square and again burnish with bone folder
  • Fold out again to form another new shape (sort of cross) and again burnish with bone folder
  • Fold out again to form new square - this is the last square, again burnish with bone folder
  • Carry on folding out the card to loosen it and making sure it flips well
  • if it catches at any point you may need to trip slightly 
Now decorate each face of the squares as shown in the pictures.

I have made a video tutorial so if you pop back to my blog tomorrow you will see the video tutorial linked here. 

I hope you liked this project and are enjoying the other fancy fold projects in the hop. Now please click on the next button below to see the next blog.

Thanks for joining me today

Gez x


Thursday, 22 February 2018

Hand Stamped Half Cracker Gift Box With Hidden Gift Box Using Stampin Up Waterfront Stamp Set

The new Stampin Up stamp set Waterfront is just stunning. There are many examples around of the amazing scenes you can make using this set but I wanted to use them differently. I used the different shapes in the set to hand stamp my own patterned paper.

Waterfront hand stamped DSP

I created this half cracker box for a Yankee Candle, I added a hidden box lid so that you could use it for a money gift or some jewellery maybe. This was a make I designed for a class and the participants were really pleased with their efforts and amazed themselves with their achievements. I allowed people to chose which stamp set they used and what colour combinations they wanted. The results were stunning.

Waterfront hand stamped DSP

Measurements for Half Cracker Box

  • Half a sheet of A4 Extra Thick Whisper White
  • Stamp all over using the Waterfront stamp set
  • Colours I used: Rich Razzleberry, Berry Burst, Flirty Flamingo, Fresh Fig and Powder Pink
  • Score on long side @ 2 - 4 - 6 - 8
  • Score on the short side @ 1 - 1 1/2 - 2 - 4 1/4
  • Envelope punch board from the end with the 3 score lines punch @1 1/2  on all score lines on long side
  • Whisper White organza ribbon to tie around the cracker 

Measurements for the Hidden Box Lid

  • Berry Burst Cardstock 3 7/8 x 6 7/8
  • Score @ 1 on all 4 sides
  • On Long side score @ 2 15/16
  • Rotate cardstock 180० and score @ 2 15/16
  • Box is made up as a pizza style box
  • Smal hole in lid where some Whisper White Sheer ribbon was threaded and knotted to form a loop.
  • Small thumb hole was punched out
Waterfront hand stamped DSP

Now you have all the card stock, ink  and stamps gathered why not click on the video and craft along with me :-) 


I do hope you are enjoying the projects from the new Spring Summer Catalogue, I will be back soon with another one

Gez xxx

My Shop 

My shop is open 24/7 Click here to shop! Remember that during Sale-A-Bration you earn free products for every £45 you spend (not including p&p)

Joining Offer

There is no better time to join Stamping' Up, during Sale-A-Bration you get to chose

  • £130 worth of products for your starter kit 
  • AND 2 stamp sets of your choice 
  • All for £99 (p&p free with starter kits). 
  • 20% discount on future orders, rising to 25% when promoted
  • There is no obligation to sell you can be a hobby demonstrator and just shop for yourself with the 20% discount. 
  • Click here to join my team!


Follow me on Facebook

Follow me on Instagram

Follow me on Pinterest

Wednesday, 21 February 2018

Stampin' Up!® Second Release Sale A Bration Items

You've got to love Stampin' Up, they have added new products to Sale-A-Bration. Amazingly stunning speciality designer series paper - more like card stock, a lovely stamp set that could fit the gap Gorgeous Grunge left and a bundle that consists of a stamp set and a Texture Impressions embossing folder.

I am so excited to create with these products. I have had a quick little play and I cannot wait to get designing new projects with them for you.

https://su-media.s3.amazonaws.com/media/catalogs/Sale-A-Bration%202018/2nd%20Release/20180216_SAB18-2_en-UK.pdf


I have filmed a short video that shows the products, so press below to see them.


Download the pdf here :-)

My Shop 

My shop is open 24/7 Click here to shop! Remember that during Sale-A-Bration you earn free products for every £45 you spend (not including p&p)

Joining Offer

There is no better time to join Stamping' Up, during Sale-A-Bration you get to chose

  • £130 worth of products for your starter kit 
  • AND 2 stamp sets of your choice 
  • All for £99 (p&p free with starter kits). 
  • 20% discount on future orders, rising to 25% when promoted
  • There is no obligation to sell you can be a hobby demonstrator and just shop for yourself with the 20% discount. 
  • Click here to join my team!


Follow me on Facebook

Follow me on Instagram

Follow me on Pinterest

Tuesday, 20 February 2018

Half Cracker Box using Stampin' Up Beautiful Peacock

Here I am with a little project using a FREE stamp set from Sale-A-Bration. Stampin Up have lots of amazing products to give away at the moment and last week they added new products which I will be bringing you projects with these very soon. For now lets look at todays project 😀

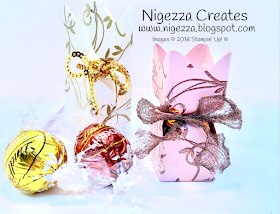
Sala-A-Bration Beautiful Peacock half cracker box

This little Half Cracker Box is the perfect size to hold a Lindor Chocolate.

Hand Stamped Cardstock

  • Using Versamark ink stamp all over the Powder Pink Cardstock using the swirls from the Beautiful Peacock stamp set
  • Cover with the Copper Embossing Powder
  • Heat

Measurements

  • Powder Pink Cardstock 5" x 3 7/8"
  • Score on the long side @ 1 1/8" - 2 1/2" - 3 3/8" - 4 1/2"
  • Score on the short side @ 1 1/8" - 2 1/4" - 2 1/2" - 2 3/4"
  • Fold and burnish all score lines

Envelope Punch Board

  • Punch on all score lines on the short side
  • Punch at the point with the 3 score lines 1/4" apart
  • Place the end @ 1 3/8" and punch 
  • Repeat on all 4 score lines
  • On the long side punch in-between each score line to form the decorative top

Ribbon

  • Tie ribbon around the cracker using the 1/4" Copper Trim
  • I tied a bow and then pulled it into shape to give it more dimension  
Right now you have all the supplies, watch the video tutorial and craft along with me 😀 


I hope you enjoyed this project,

Gez xxx

My Shop 

My shop is open 24/7 Click here to shop! Remember that during Sale-A-Bration you earn free products for every £45 you spend (not including p&p)

Joining Offer

There is no better time to join Stamping' Up, during Sale-A-Bration you get to chose

  • £130 worth of products for your starter kit 
  • AND 2 stamp sets of your choice 
  • All for £99 (p&p free with starter kits). 
  • 20% discount on future orders, rising to 25% when promoted
  • There is no obligation to sell you can be a hobby demonstrator and just shop for yourself with the 20% discount. 
  • Click here to join my team!


Follow me on Facebook

Follow me on Instagram

Follow me on Pinterest
Sunday, 18 February 2018

Pootlers Team Card Swap

I love being a Pootler, it is such an amazingly supportive and talented team. With every new catalogue we do a team card swap. We are put into groups and we make  a card for each member and then make and send the card. We then get 5 cards to inspire us, these are then shared in the whole group and we get to see everyones designs. This is such a good way to share our ideas and get to see some of the new products that we may not have bought ourselves. The down side is that my wish list often gets longer lol!

I wanted to use both Sale-A-Bration and new Spring Summer catalogue products in my card.

SAB 2018 Nigezza Creates


I have used the free Sale-A-Bration stamp set Happy Wishes as well as the Petal Palette stamps and Petals and More thinlits.

Measurements

To make this card I cut the layers as below - 
  • I used some Dapper Denim as my base - A4 cut in half and scored in half, this makes a C6 card 5 7/8th x 4 1/8th
  • I cut a mat in Tranquil Tide  card stock j- 5 5/8th x 2 1/2
  • I cut some standard Whisper White 1/4" small on each side  -  5 3/8th x 2 1/4 
  • I used the leaf framelit  and cut out a spray in Tranquil Tide

Assembling the card

  • Card base was randomly stamped with the leaf stamp from Petal Palette
  • The Whisper White mat was stamped with Happy and Birthday from Happy Wishes
  • The flowers were coloured in using the water colour pencils
  • This was then stick to the Tranquil Tide mat
  • This was in turn stuck to the card base
  • The leaf spray was stuck over the top
So now watch the video and craft along with me :-) 


Here are the cards I received from my team mates #pootlersrock

Pootles Card Swap


Pootles Card Swap

This card was made by Katrina King, she can be found @ http://katrinaspapercraftingcorner.blogspot.co.uk

Pootles Card Swap

This card was made by Jill Chapman, she can be found @  www.paperdaisycrafting.blogspot.co.uk

Pootles Card Swap

Pootles Card Swap
  

This card was made by Linda Worth she can be found www.lilocrafts.co.uk  

Cheers for now

Gez xxx

My Shop 

My shop is open 24/7 Click here to shop! Remember that during Sale-A-Bration you earn free products for every £45 you spend (not including p&p)

Joining Offer

There is no better time to join Stamping' Up, during Sale-A-Bration you get to chose

  • £130 worth of products for your starter kit 
  • AND 2 stamp sets of your choice 
  • All for £99 (p&p free with starter kits). 
  • 20% discount on future orders, rising to 25% when promoted
  • There is no obligation to sell you can be a hobby demonstrator and just shop for yourself with the 20% discount. 
  • Click here to join my team!


Follow me on Facebook

Follow me on Instagram

Follow me on Pinterest