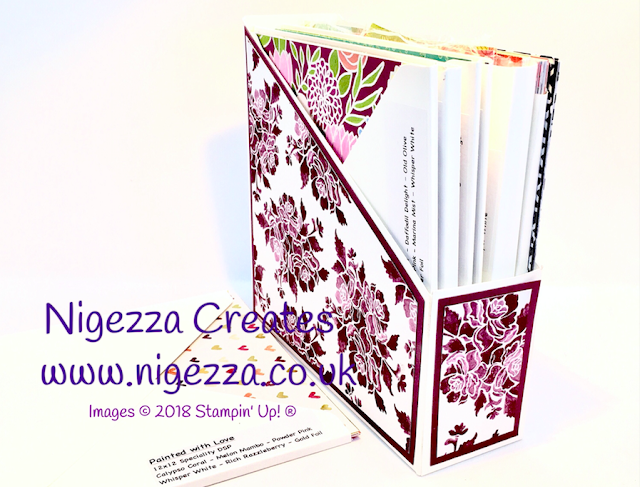
I hope you enjoyed my ribbon share storage, here is a matching box for Stampin' Up! paper. I wanted some way of storing the loose leaf paper that would protect the paper, keep it together, hold the scraps and look pretty. I think I managed it :-)
Paper Pockets
I used the Envelope Punch Board to make the envelopes to hold the paper. I used The crafty Owl Box Buster to calculate the size of paper and where to punch and score. This is a really useful tool and I highly recommend it.
Measurements for the pockets
To hold a full pack of 48 sheets I recommend a depth of 3/8". To make this pocket you need:
- 9 7/8" x 9 7/8' cardstock
- First punch 4 5/8th
- Score
- Second punch 5 1/4"
- Score
- Rotate and use the score lines as a guide for the next punch and score positions
- Repeat on all 4 sides
I did not have any full packs as it was a paper share so I made smaller pockets:
1/4" Deep
- 9 5/8" x 9 5/8' cardstock
- First punch 4 5/8th
- Score
- Second punch 5"
- Score
- Rotate and use the score lines as a guide for the next punch and score positions
- Repeat on all 4 sides
1/8" Deep
9 1/2" x 9 1/2' cardstock First punch 4 5/8th Score Second punch 4 7/8" Score Rotate and use the score lines as a guide for the next punch and score positions Repeat on all 4 sides
Labels
- I wanted to label each pocket with the name of the paper and also the colours that were in the papers
- This helps to match the ink and cardstock, ribbons and embellishments
- And give correct information in my tutorials! lol
To make the Box
- 2 sheets of Extra Thick Whisper White 9 1/4" x 8 1/4"
- For each sheet
- Score on Long side @ 2" & 8 1/4"
- Score on Short side @ 2"
- Remember that these will make a left and a right side of the box
- One side will have a 2" flap on the front and a 1" at the back
- The other side will have a 1" on the front and a 2" at the back
- You need to cut 3" up on the 2" section of one piece and cut a diagonal line to the score line
- Repeat on other piece but this time cutting across the 1" and diagonally to the score line
- The picture above shows where the cut lines are
Decorating the box
- I used Fresh Fig cardstock and Fresh Floral DSP to match my ribbon box
- Fresh Fig mats
- 6" x 1 3/4"
- 2 3/4" x 1 3/4"
- 2 - 6" x 6" - these are then cut from 2 3/4" to the opposite point to form a diagonal cut
- Fresh Floral DSP
- 5 3/4" x 1 1/2"
- 2 1/2" x 1 1/2"
- 2 - 5 3/4" x 5 3/4" - these are then cut from 2 1/2" to the opposite point to form a diagonal cut
Now you have everything cut to size press play below and craft along with me 😊
Click here for the tutorial for making the ribbon box and bobbins :-)
I hope you found this useful, I would love to see your versions if you make this, I have loved seeing peoples ribbon boxes and I thank those who have shared them with me 😊
See you again soon
Gez xxx
My Shop
My shop is open 24/7 Click here to shop! Remember that during Sale-A-Bration you earn free products for every £45 you spend (not including p&p)Joining Offer
There is no better time to join Stamping' Up, during Sale-A-Bration you get to chose- £130 worth of products for your starter kit
- AND 2 stamp sets of your choice
- All for £99 (p&p free with starter kits).
- 20% discount on future orders, rising to 25% when promoted
- There is no obligation to sell you can be a hobby demonstrator and just shop for yourself with the 20% discount.
- Click here to join my team!
Follow me on Facebook
Follow me on Instagram
Follow me on Pinterest


Great idea. Thanks you. Xx
ReplyDeleteI am really glad you like it :-)
Delete